Advantages of using links
Link in blogs and sites are primarily used to link similar pages and thereby interest the reader with other posts of our resource.During such a connection, the pages of our blog are relinking. In such way, we can help our blog to become more readable, which could make him more popular in search systems.
However, the main thing is that we need to relink between each other only similar within the meaning pages. If the topic of relinking pages is different that even could break down your SEO.
Links should also be used if we need to indicate a different site or blog in posts so that users can go to it.
How to make HTML link
In each platform, be it a blog, website, forum, etc. HTML editor is also provided. So go to your HTML editor and write the following code:<a href="link.com"> anchor </a>Anchor - this is a text that follows the link
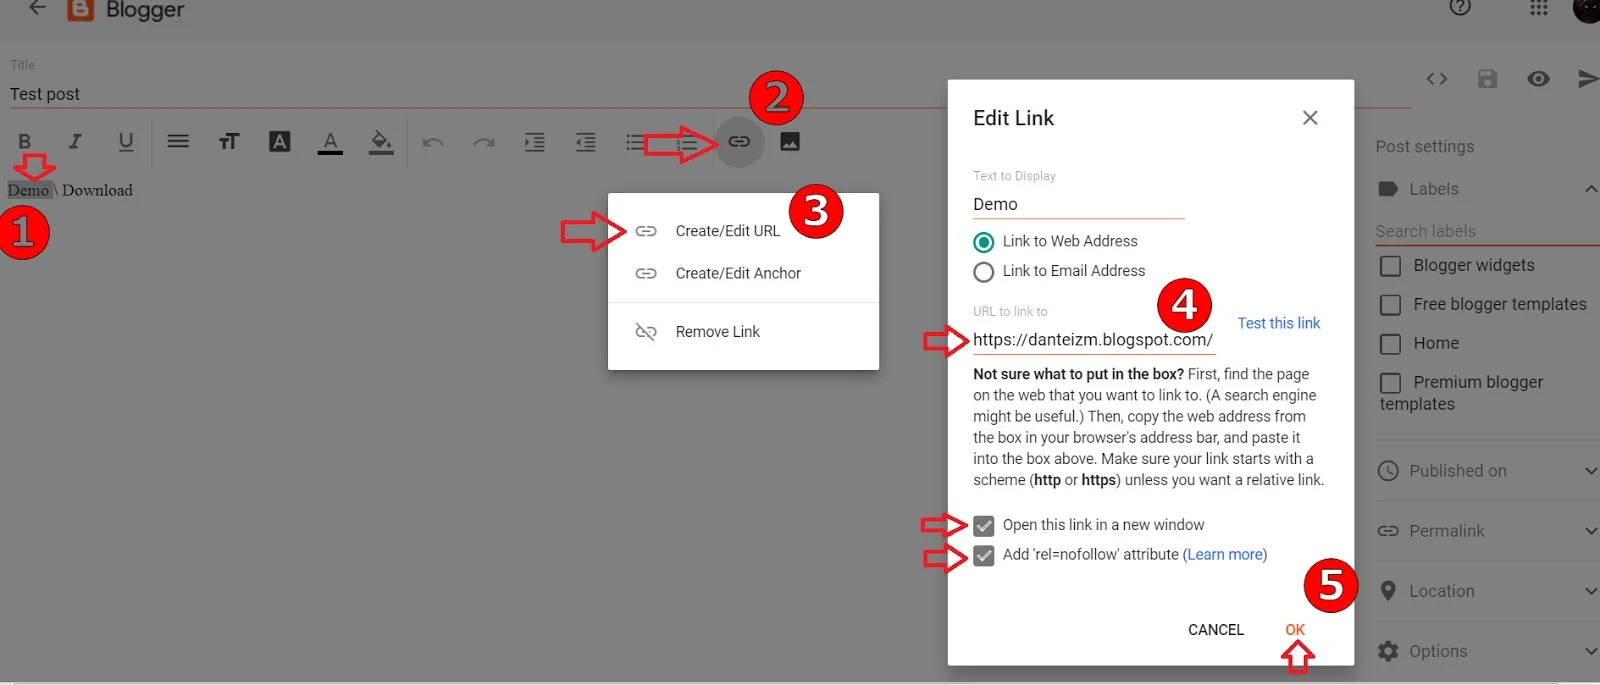
I just showed you a general method for creating HTML links. However, in all modern editors, links can be created much easier. You just need to find an icon or symbol on the dashboard that looks like a chain, and sometimes this function is signed as "Link".
Look at the picture where you can see two sentences:
- Open this link in a new window
- Add "rel=nofollow" attribute
So what does it mean? If you activate these two functions, first, if somebody clicks on a link, then a page will open in a new window. Rel=nofollow attribute needs to use when you add a link on other website or blog, it's also called as external link. The link itself gives part of its rating to another page, when this is the page of our blog, it’s fine, however, if this is a page from another resource, then it will be advisable if we keep the rating of our publication using attribute "rel=nofollow". You also can add these attributes in HTML like this:
<a href='link.com' target='_blank' rel='nofollow'> anchor </a>How to make HTML link button
It's really simple to do. First, create an HTML link in the same way as we do it in the first chapter. So it will look like:
<a href='link.com' target='_blank' rel='nofollow'> anchor </a><a class='button' href='link.com' target='_blank' rel='nofollow'> anchor </a>
Now we can write CSS code for our button.
.button{color:#fff;padding:8px;border-radius:5px;background:#ff6007;box-shadow: 2px 2px 4px -2px rgba(0,0,0,0.9)}Result: My home page
Our mission complete.
Hope you enjoyed this lesson. Leave your comments and watch other posts about HTML and Blogger. See ya
Color Generator
#ffffff


.png)

.png)
%20(1).png)
